

 (25 votes, average: 3.48 out of 5)
As technology and software become more and more complex, quality assurance departments face more significant challenges every day. They are forced to validate products faster and in a safer way. Mobile automation with Robot Framework and Appium will make your team’s life easier.
So, what can you do when the demand is high and the validation period is short? You start automating. Automation is the execution of the same predefined steps over and over, so you don’t need to complete them manually.

Never stop learning! Automation saves time and money. But you need to do it right.
The journey to successful automation starts with the right tools and the right people to do the work. One barrier to getting started is that people with validation skills don’t always have the programming skills needed for most automation solutions.
Robot Framework
Robot Framework is a generic automation framework designed for a significant number of applications. You can use the framework for testing apps on the web — both on mobile and desktop — and much more.
The idea behind this framework is that automation must be independent of operating systems and applications. This means that you can use it to automate Linux, Windows, Mac, and other applications and use libraries written in your favorite programming languages, Python or Java.
Test cases are simple text files with a robot extension. You can edit them in your favorite integrated development environment. PyCharm with Robot Plugin is excellent for writing Robot Framework test cases because it offers syntax highlighting and other benefits that help you write cases.
One of the best features of Robot Framework is that it uses a keyword-driven testing approach, so you don’t have to actually “touch” coding. What does this mean?
Here’s a basic example of a Robot Framework test case for the web using SeleniumLibrary and Selenium:
*** Settings ***
Documentation A test suite with a single test for valid login.
Library SeleniumLibrary
*** Test Cases ***
Valid Login
Open Browser https://www.example.com chrome
Input Text xpath://input[@id=”username”] demo
Input Text xpath://input[@id=”password”] mode
Click Element xpath://button[@type=”submit”]
Wait Until Page Contains Welcome to your account!
[Teardown] Close Browser
In this example, we are using keywords provided inside SeleniumLibrary (“open browser,” “input test,” “click button”) to create a test case that will:
- Open the Chrome browser to the desired page (https://example.com).
- Input the username “demo” inside the input field with the provided XPath.
- Input the password “mode” inside the input field with the provided XPath.
- Click the “submit sign-in” button.
- Wait until the welcome message is displayed, so the user knows the sign-in was successful and they are redirected to the proper page.
This is the keyword-driven method. As you can see, we aren’t touching any programming language, and keywords are written to be self-explanatory. Of course, there are many libraries for many testing applications. You can find the available libraries listed on the Robot Framework website.
The beauty of this is that you can use existing library keywords to create user-defined keywords. For example:
Test Login With Demo User
Input Text xpath://input[@id=”username”] demo
Input Text xpath://input[@id=”password”] mode
Click Element xpath://button[@type=”submit”]
Wait Until Page Contains Welcome to your account!
Because we have written our own keyword, we can use it in the test so that the final result looks like this:
*** Settings ***
Documentation A test suite with a single test for valid login.
Library SeleniumLibrary
*** Keywords ***
Test Login With Demo User
Input Text xpath://input[@id=”username”] demo
Input Text xpath://input[@id=”password”] mode
Click Element xpath://button[@type=”submit”]
Wait Until Page Contains Welcome to your account!
*** Test Cases ***
Valid Login
Open Browser https://www.example.com chrome
Test Login With Demo User
[Teardown] Close Browser
You can declare custom keywords inside resource files so that they can be called where they are needed. You can find more examples on the Robot Framework website.
Robot Framework is open source. It’s hosted on GitHub, and it has a growing community of developers working around the clock to keep it updated, add new functionalities, and solve bugs. You can browse the documentation section of the website to find installation instructions, user guides, demos, videos, and much more. Getting started with Robot Framework is easy.
To automate mobile applications with Robot Framework, we need another tool to interact as the “translator” between Robot Framework and the mobile device. This is where Appium comes in.
Appium
Appium is another open-source tool for automating apps on iOS, Android, and Windows. You can use it to automate native apps written using the iOS, Android, or Windows software development kit (SDK); mobile web apps accessed using a mobile browser; and hybrid apps with a wrapper around a web view, a native control enables interaction with web content.
It is useful to note that Appium is cross-platform. This means you can create test cases against multiple platforms (iOS, Android, Windows) using the same API.
Appium was designed to meet mobile automation needs according to a philosophy outlined by the following four tenets:
- You shouldn’t have to recompile your app to automate it.
You can automate the application during a test without creating a special type of build for it or installing it on the operating system with special conditions. You need to install the application on the device as you usually would, inspect the elements and start automating.
- You shouldn’t be locked into a specific language or framework to write and run your tests.
The job of the Appium client is to provide data to the Appium server, which sends it to the application under test. No matter the source of the Appium client language (Python, Java, C#), requests are translated into JSON format by the Appium server and sent to the application (JSON Wire Protocol) over hypertext transfer protocol (HTTP).
- A mobile automation framework shouldn’t reinvent the wheel when it comes to automation APIs.
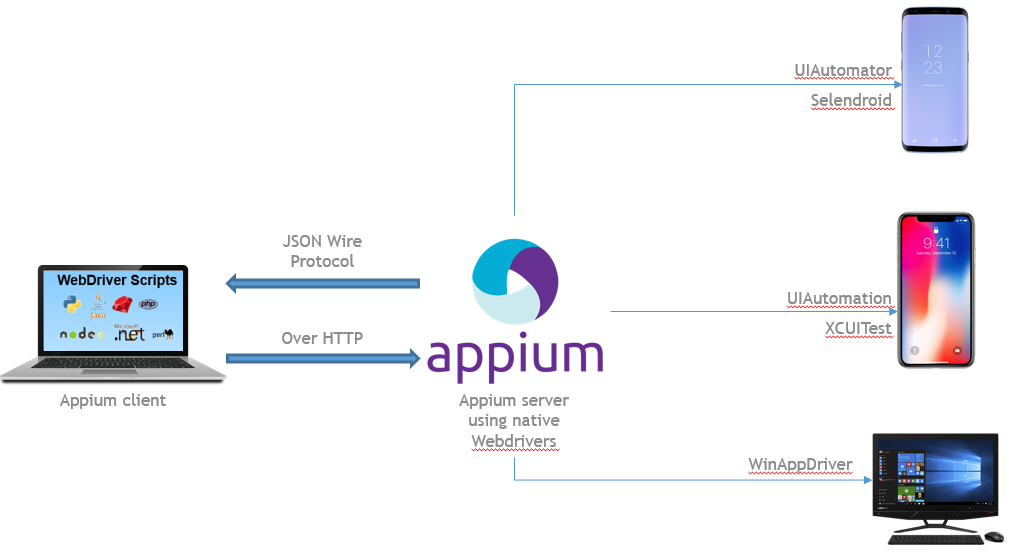
Instead of developing their webdrivers to communicate with the application under test, Appium uses the platform’s webdriver and calls it directly to communicate and do actions on the device. For Android, it uses the native webdrivers UIAutomator and UIAutomator2. For iOS above version 9.0, it uses XCUITest, and for Windows, it uses WinApp.
- A mobile automation framework should be open source in spirit and practice and as in name!
Appium is also hosted on GitHub, and it has a great community that keeps standards remain high and ensures that users don’t get into trouble when OS or other third-party apps are updated.
Installation instructions and further documentation can be found on Appium’s official website. Also, you will need to install Java and Android SDK tools to run tests on Android devices correctly.
Mobile Interface Elements
To automate a mobile application, you must first be able to inspect elements on the interface. This means opening the application on the device and using an inspector. Luckily, Appium has a built-in tool that helps get the job done.
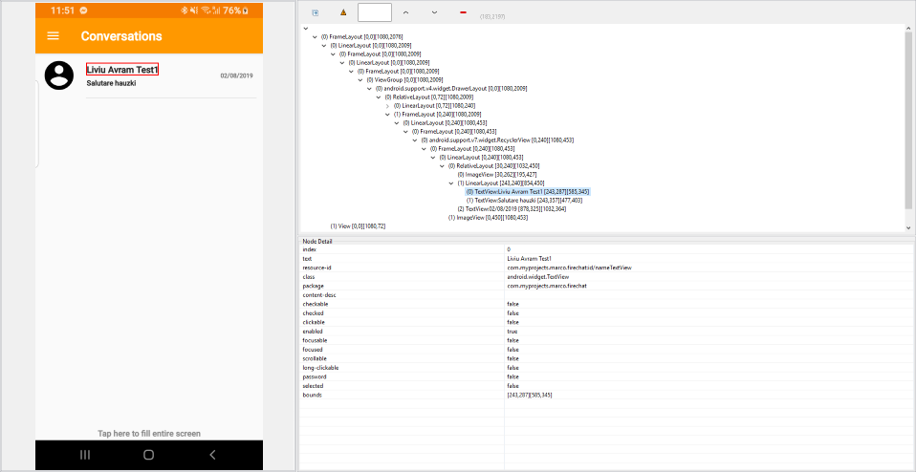
For Android, we can also use “uiautomatorviewer,” which is part of ADB tools. Here’s an example of how the Android mobile interface looks under the inspector.
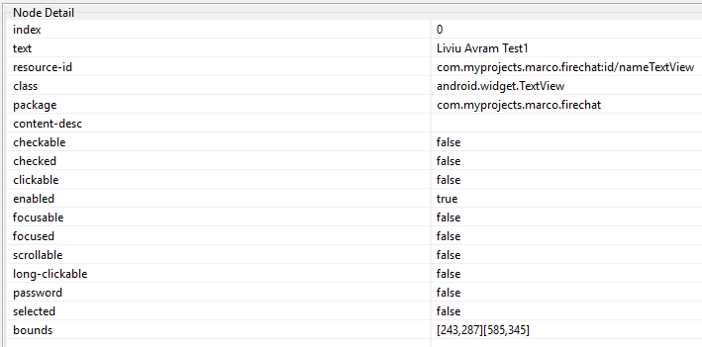
UI elements can be declared as XPath expressions, IDs or any other method available. Let’s take a closer look at this interface and see how they can be declared.
XPath examples for this element:
- //android.widget.TextView[@text=‘Liviu Avram Test1’]
- //android.widget.TextView[contains(@resource-id,’nameTextView’) and @text=‘Liviu Avram Test1’]
- //android.widget.TextView[@text=‘Liviu Avram Test1’ and @enabled=‘true’]
As you can see, each element has a class, a resource ID and other attributes that help us correctly identify it as unique.
In order to inspect iOS interface elements, the Appium inspector is used. Its interface is similar to that of Android, and the elements are also identified by class, ID and other attributes.
IMPORTANT NOTE: Android tests can be run on Windows, Linux or macOS, while iOS tests can be run only on macOS. The reason for this is that Android tests rely on Android Studio and SDK tools which can be installed and run on all the above declared operating systems, while iOS tests rely on xCode, developed by Apple and only available for macOS.
Mobile Automation with Robot Framework and Appium
Now that we understand how Robot Framework and Appium work, it’s time to put them together and create our test cases.
First, we need to start an Appium server. This contains a link and a port, which are used to interact with the device. Each Appium instance should have its own port, so we need to create as many server instances as we have devices. An Appium server can either be started using Appium Desktop or command line.
Example for starting Appium using the command line:
- appium –port 4725
- appium –port 4726
In this example, we have started two Appium server instances on ports 4725 and port 4726. The Appium client will use these to send commands to the tested device. The default port is 4723. There are other attributes besides ports that can be used when starting a server. The complete list is available here.
As we said before, to automate something, we must first import a library in the Robot Framework. For Appium, the library is called AppiumLibrary, and its documentation can be found here.
Used keywords are similar to those used by SeleniumLibrary, so at this point, you can have an idea about how easy it is to switch and learn how to automate on different platforms.

To execute a test case on the mobile device (Android), we first connect it to the PC with the USB cable and activate the “USB debugging” option from the “Developer options” menu as shown.
Now that we started an Appium server instance and we connected our mobile device, let’s see how a mobile test case looks in Robot Framework to open a certain application on the mobile device (Android):
*** Settings ***
Library AppiumLibrary
*** Test Cases ***
Open Application On Android
Open Application http://localhost:4725 udid=< deviceid > platformName=Android deviceName=AndroidDevice app=com.example.com
appActivity= com.example.com.MainActivity
[Teardown] Close Application
In this script, we are importing the “AppiumLibrary” inside the “Settings” section of the script to use all the keywords that belong to this library. Then, in the “Test Cases” section, we must first declare a name for our test case to appear on the execution log.
The most important command to start the automatic test is the “Open Application” keyword so that Appium can begin interacting with the device. In this example, Robot Framework acts like the Appium client, and it sends the code to the Appium server, which transforms data into JSON and sends it to the device.
The “Open Application” command must be used along with minimum arguments, as shown above. They are:
- Appium Server instance URL (mandatory): http://localhost:4725
- UDID of the device under test so that Appium knows which device to connect to: udid=< deviceid >(This device ID can be obtained by running the following command inside a terminal: adb devices.)
- Name of the platform under test: platformName=Android
- Name of the device under test: deviceName=AndroidDevice (This name is chosen by the user and it’s given only as a reference. It doesn’t have to match the actual device name set in the settings section of the OS.)
- Application package, as seen inside the interface inspector, corresponding to the “package” attribute
- Application activity required for Appium to know which page of the application to open (In most cases, this is declared as the main activity, but a list of all activities available for a certain application can be inspected using an Android application called Apk Info, available on the Google Play store. For iOS devices, you only need the bundle ID of the application.)
Finally, in order to run the test case, we use the following command inside a terminal:
robot testcasename.robot.
If Robot Framework and Appium are correctly installed, “robot” will be recognized as an internal command of the OS and the test case will run smoothly.
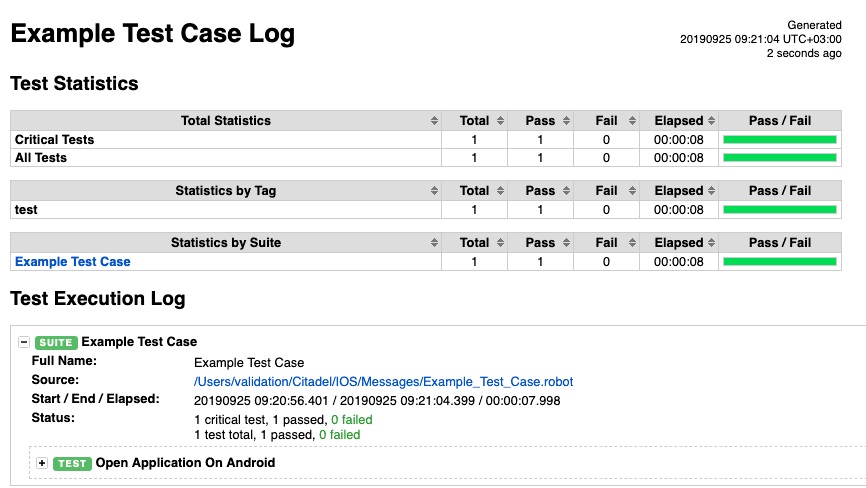
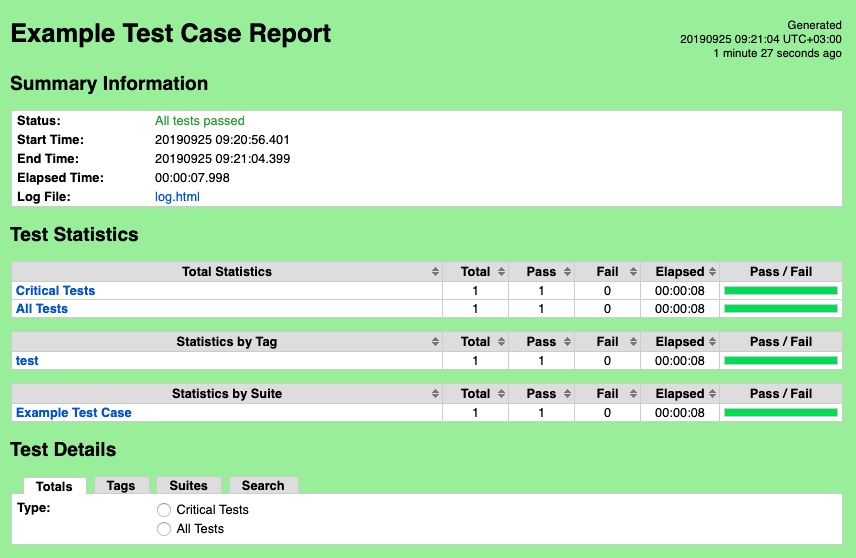
In the end, Robot Framework creates a beautiful log with the execution summary as well as an execution report. Both are in HTML format so they can be opened and inspected inside a browser.
With all this powerful information in hand, I wish you happy (mobile automation) testing!
If you want to learn more about Robot Framework and mobile automation, feel free to check out my YouTube channel to view a complete Robot Framework tutorial and get automation tips, tricks and more.
Has this article sparked your interest in mobile automation? If you have any questions regarding this topic, please post a comment! I’m happy to help.


Leonardo Alonso Quintero
May 19, 2020 at 8:27 pm EDTHi. Can you provide more details how to install Appium environment? I already installed Robot Framework successfully, also Appium server, but not sure how to map mobile device and where to get Appium inspector. Thanks.
Liviu Avram
May 21, 2020 at 7:44 am EDTHello, If you are using Android, you must first install Android Studio with sdk tools (https://developer.android.com/studio/install) and set %ANDROID_HOME in your path (you can google the proceure for this depending on your OS). Be sure to enable usb debugging on your device as described in the article and then open a terminal and type “adb devices”. Your device should be available in the list that is returned. If all the above conditions are met, you can inspect your Android device interface using uiautomatorviewer. The executable can be found inside %ANDROID_HOME\tools\bin folder. Good luck!
Neha
October 9, 2020 at 5:34 am EDTHi , Thanks for this information . Appium is hosted on device bridge GIGA fox url(http://**.**.***.***/Appium“) where devices are hosted so I am passing that URL in Appium URL.This needs a connection to be established using username and Key to access that . How I can pass them as parameters along with others in Open application Keyword. Thanks much ! Thanks, Neha Dua
Liviu Avram
October 16, 2020 at 7:29 am EDTHello Neha, I didn’t work with hosted devices yet so I couldn’t answer this question. Never tried it.
Uma
January 19, 2021 at 10:30 am ESTHello, Can you provide more details for ios? Do we need any other driver to test on ios?
Liviu Avram
January 20, 2021 at 1:42 pm ESTHello, For iOS you need Appium and xCode which only works on a Mac. Also, you need an apple account to install the application.
ganapathi
June 13, 2023 at 7:01 am EDTThanks for this information .Neha